Friday, May 22, 2015

Windows 8, 8.1 and Windows 7 Language Bar Missing, How to Get It Back


If you are a computer user who uses more than one language for typing or as input language, then you must be knowing the importance of language bar in task bar (notification area). Sometimes it may act strange and disappear from taskbar. This simple guide shows how to solve Windows 8, 8.1 and Windows 7 Language bar missing issue on your desktop and laptop. In few cases even after enabling language bar in control panel, it will disappear on Windows 7 or Windows 8, 8.1.
You may face this issue mostly after doing Windows or other software update. Surprisingly sometimes you will see the language bar when UAC prompts for administrator elevation and it will disappear again on normal mode.
This is mainly due to fault in a startup service on specific user profile in Windows 7, Windows 8 and 8.1.

How to Fix Windows 8, 8.1 and Windows 7 Language Bar Missing Issue

Method 1 (If you have done this already, go to method 2 straight away)-
You can add the language bar in control panel by following steps,
On Windows 7
Go to Control Panel -> Regional and Language Option -> Keyboards and Languages -> press Change Keyboards.
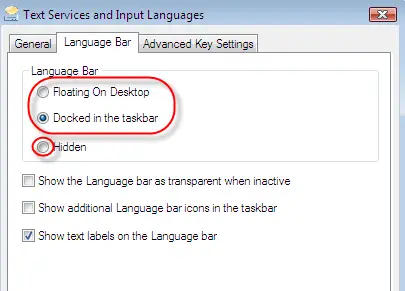
The following dialog box will appear,
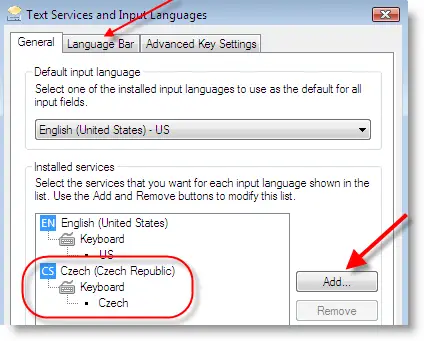
Windows 7 Language Bar Missing
Note: Language bar will be displayed either on taskbar or Desktop only if you have selected more than one language as input language.
Make sure that your second language is listed in the input language list. If not, you can add it by clicking Addbutton.
Still if language bar is missing in Vista or Windows 7 even after more than one languages are listed; go to‘Language Bar’.
language bar windows 7
Here you can select the place where the language bar should appear. Make sure ‘Hidden’ is not selected. Select the appropriate option and press OK.
 On Windows 8 and 8.1
It is the different you can enable and show language bar in latest Windows 8 and 8.1.
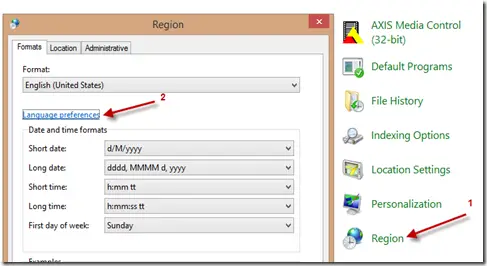
In the control panel, open Region and click on ‘Language preferences’.
Open language bar option
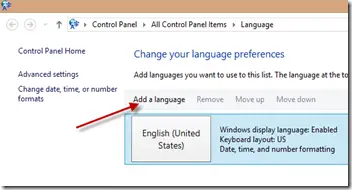
Click on ‘Add a language’ as shown below.
add language
You can select and add the language in the next screen. Once you have added more than one language, you will see the language bar on Windows 8, 8.1 notification area.
language bar in task bar
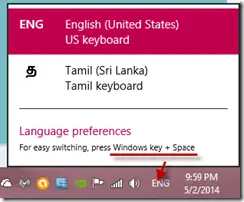
To change the input language quickly in Windows 8 or 8.1, you can use Windows key+Spacebar to switch between languages.
These above steps are very straight forward methods to show language bar on Windows 7, 8 and 8.1. As said earlier due to a startup service issue the language bar will be missing from the OS even after enabling it.
In that case follow the below steps. This method is completely applicable for Windows 8, 8.1 too. Even though below screenshots have been taken on Windows 7, you can still safely use on latest Operating Systems.
Remember to take a backup of registry before modifying if you are not comfortable with play around in registry, because wrong modification can cause issue to Windows OS.

Method 2
This method will enable the startup service required for language bar and it will run every time when OS boots.
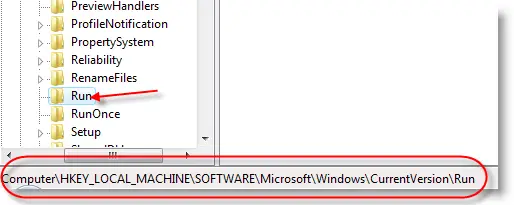
Go to Registry editor by typing regedit in Run or search box. Go to the following location,
Language Bar Missing in Vista or Windows 7
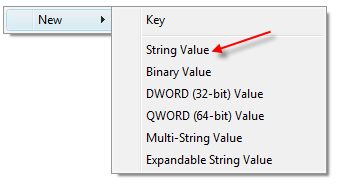
 Right Click on blank space on right side, select New String Value.
vista language bar missing
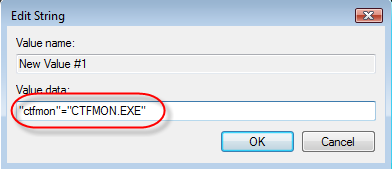
Again right click on the newly created value and select modify, then type as shown below.
ctfmon”=”CTFMON.EXE”
Windows 7 Language Bar Missing
 Press OK and restart your computer. Now will get back the missing language bar in Vista, Windows 7 and Windows 8, 8.1.
Thursday, May 21, 2015

为了教育与防范女儿被性侵,聪明的妈妈巧妙「改编」了迪士尼童话故事...


(示意图)
每次看见女童被性侵的新闻,我都非常难过,
因为我们都有儿女。
如果机械地告诫孩子「要小心男老师和校长,他们有可能会伤害你」,
就会让孩子丧失对世界的信任,
甚至令她对异性产生恐惧,影响她未来的婚恋观。

到底要怎么做, 才能既提醒女儿,又不会伤害到她呢?
父母必学的智慧!赶紧来看看吧...
有一天,我看了一部义大利电影《美丽人生》,突然有了灵感。
这个电影讲的是纳粹时期的故事,
全家被抓入集中营后,
父亲为了不让孩子留下心理阴 影,
就对儿子说,集中营里发生的一切都只是一个游戏,
只要不违反游戏规则,就能获得一部坦克。

虽然集中营的生活很恐怖,但是孩子却快乐地生存下来,
直至获 救,心中依然充满爱与希望……
我决定像这位聪明的父亲一样,
用一种柔和的方式,
帮女儿建立起保护自己的意识—改编童话故事。
女儿很喜欢芭比娃娃,有很浓的「公主」情结。
所以,我特地在她 6岁生日那天,
送了一个美丽的芭比公主玩偶给她,
并且温柔地说:
「做公主可不是那么容易的,
她们必须遵守芭比学校的公主守则。
否则就算穿得再漂亮,也不是真正的公主。」
听了我的话,
女儿连忙追问:「那芭比学校有什么公主守则呢?」
「我每天给你讲一个故事,
每个故事里都有一条公主守则,怎么样?」
「好呀好呀,我最喜欢听故事了!」女儿欢唿雀跃道。
故事中,带给女儿正确的观念

我给女儿讲的第一个故事是《新白雪公主》:
「白雪公主深知男女有别,
所以虽然跟7个小矮人是好朋友,
但每次洗澡和换衣服时,她都会关好门窗,
而且每晚都会回自己的房间睡觉。
其实白雪公主,并没有真的吃下巫婆给的毒苹果。
她趁巫婆不注意,偷偷换了一个好苹果,然后假装中毒。
如果真的中毒,怎么会那么容易 就活过来呢?
白雪公主会换苹果,是因为她知道,
公主不能吃陌生人给的食物,否则自己就会有危险。
而且当时小矮人不在家,
如果直接揭穿巫婆的诡计,她可能会 受到伤害……」
女儿惊讶地叫道:
「原来是这样呀!我就觉得白雪公主不该那么笨,
死了一次又一次,否则王子怎么会喜欢她呢?」

接下来的一段时间,
我又对《仙杜瑞拉》《豌豆公主》等童话,进行了改编:
「仙杜瑞拉之所以要在12点之前赶回家,
不仅仅是怕美丽的衣服和鞋子被打回原形,
还有一个原因是,她觉得一个好女孩,不应该在外面待到太晚。
正因为她的坚持,
王子才被她深深打动了,认为她不只拥有美貌,
而且还是个自尊自爱的好姑娘,适合当未来的王后……」
女儿渐渐 知道如何保护自己...
「在得知豌豆姑娘是真正的公主之后,
王子高兴地送了一条项链给公主,
并邀请公主当晚留宿在自己的房间里。
公主果断地拒绝,
并且告诉 王子,真正的公主在婚礼之前,
是不会跟男子住在同一个房间的,也不会随便接受别人的礼物。
你的做法不像一位真正的王子,所以我不会同你结婚。
后来王子意识 到了自己的错误,再三向公主道歉,
并且保证在结婚之前一定不会冒犯公主,豌豆公主这才原谅了他……」
王子与公主幸福背后的真相
不知不觉中,我改编了十几个童话。
我充分发挥自己的想像力,尽量把故事讲得生动有趣,
女儿也饶有兴致地从中总结出了许多公主守则,
比如背心裤衩覆盖的地方绝不能让人摸、不能接受陌生人的饮水食物、
不要跟男子独处一室,就算是自己的长辈、老师或者校长也不可以……
有时候,女儿也会发牢骚,
问我:「王子不是负责保护公主的吗,
为什么公主还要这么小心翼翼地保护自己呢?
我告诉女儿:
「王子要等公主20岁以后才会出现。
在王子出现之前, 公主必须学会保护自己,优雅而高贵地活下去。
如果公主因为不会保护自己而受到伤害,
那么她可能等不到王子出现的那一天,就变成天上的星星了。
而且,如果公主什么也不做,只会被动地等待王子拯救,
她或许因为美貌一时吸引王子,
但是不会被王子所尊重,更不会成为王子的妻子。」
听了我的话,女儿似懂非懂地点点头。
经过一段时间的训练,
我帮助女儿建立起了较强的防护意识。
现在的她,非常有原则,也懂得巧妙地保护自己。
有一次,
我因为有事把女儿托给开店的妹妹照顾。
妹妹临时外出进货,
店里只剩下女儿和一个年轻的男店员,
于是女儿便跑到隔壁一对夫妇开的店里玩,
直到妹妹回来才返回店中。
妹妹问她为什么不待在店里看电视,她当时没说什么,
事后却悄悄告诉小姨,
公主要懂得保护自己,
所以最好不要跟男生单独待在一起。
自己之所以刚才没说,是怕店员哥哥不高兴……
妹妹告诉我这件事时,我很高兴:
对一个母亲来说,能赋予孩子保护自己的能力,
让她像一株带刺的玫瑰,
安全而美丽地绽放,还有什么比这更值得欣慰的呢?
这个妈妈实在太聪明又用心了, 一个好的故事,足以影响孩子的一生 ! 别忘了随时都要懂得保护自己、爱惜自己唷 ~

Wednesday, May 20, 2015

最佳激励团队短片 - 企业里最常见到的团队与人事状况

原来一般公司里都会有着这一类员工。。。 好逸恶劳的,贪图享受的,搅局份子,破坏份子。。。 当然默默耕耘,或任劳任怨的也一定大有人在。。。
你! 是又是属于哪一类呢???


Monday, May 18, 2015

How To Combine All Working Emails into Gmail

Gmail isn’t just a typical webmail system — it’s a full-fledged email client that can consolidate all your email addresses in one place. Get all your emails in a single Gmail inbox and send emails from any address.
Whether your other email accounts are also Gmail addresses or not, Gmail has you covered. Between email forwarding and Gmail’s Mail Fetcher and Send As features, Gmail is a capable email client.
Forwarding ensures email reaches your main inbox immediately. If your email service doesn’t have a forwarding feature, don’t worry — you can use Gmail’s Mail Fetcher to fetch mail over the standard POP3 protocol (see the next section.)
Each email system has a different way of setting up forwarding. If your other email account is also a Gmail account, go into Gmail’s settings, click over to the Forwarding and POP/IMAP tab and click Add a Forwarding Address.
You’ll be prompted to enter your main email address. Once you have, you’ll receive a confirmation link at your main email address. Click it to confirm that you own your main account.
After confirming, you can use the Forwarding options on your other account to forward all email to your main email address. Make sure you click the Save Changes button after.

Mail Fetcher

No forwarding feature? No problem, as long as your email account supports the standard POP3 protocol. Just go into the Accounts and Import section in Gmail’s settings and click the “Add a POP3 mail account you own” link.
Enter the email address of your other email account.
You’ll have to provide the mail account’s POP settings. You can get this information from the other email service.
If you’re using the Mail Fetcher feature, you won’t get emails immediately. Gmail will automatically check your POP3 account more often if you get frequent emails, but you’ll still have to wait.
To get around the waiting, enable the Refresh POP Accounts feature in the Labs tab on Gmail’s settings pane. This lab gives you a Refresh button in Gmail, so you can check your POP accounts immediately. (As with all Labs features, this feature could be removed at any time.)

Send As

Getting all your emails into one inbox is only half the battle. Once you have, go into the Settings screen on your main email address, click the Accounts and Import tab and use the “Add Another Email Address You Own” link.
You can add any email address you own, even if it doesn’t support the SMTP protocol. You’ll probably want to uncheck the Alias box. If you leave it checked, people will see your primary email address when you email them from another email address.
If you add a Gmail address, all you’ll have to do is click the Send Verification button. You’ll get an email with a link you’ll need to click — it should appear in your main inbox now that you’ve set up forwarding.
If you add a non-Gmail address, you’ll probably want to provide its SMTP server information — you can get this information from the other email service. When you use SMTP, Gmail sends the email through the other account’s email servers. If you use the Send Through Gmail option, Gmail will send emails through Gmail’s servers and the recipients will also see your primary email address.
Once you’re done, you can click the From box while composing a message to select an email address. When you reply to a message sent to one of your other email addresses, Gmail automatically selects the appropriate email address.
You can specify your default email address from the Accounts and Import settings pane.

You could also use Google’s multiple sign-in feature if each email address was a Gmail one, but that still leaves you with multiple inboxes to switch between. It only speeds up the switching.